Have you ever walked through the Palma de Mallorca airport and noticed passengers desperately clutching mysterious, octagonal cardboard boxes? No, they aren’t carrying secret island treasure – well, actually, they kind of are! Those iconic boxes hold the ultimate Balearic indulgence: the Authentic Ensaimada de Mallorca.
If you’ve ever visited this sun-drenched Mediterranean paradise, you already know why travelers fight for overhead bin space just to bring a single pastry home. As a long-time travel enthusiast who has explored Mallorca for over 30 years, this island is my favorite European getaway. But you don’t need a boarding pass to experience its culinary magic. Today, I’m bringing those holiday vibes straight to your kitchen with the Authentic Ensaimada de Mallorca recipe.
WHAT IS AN ENSAIMADA PASTRY?
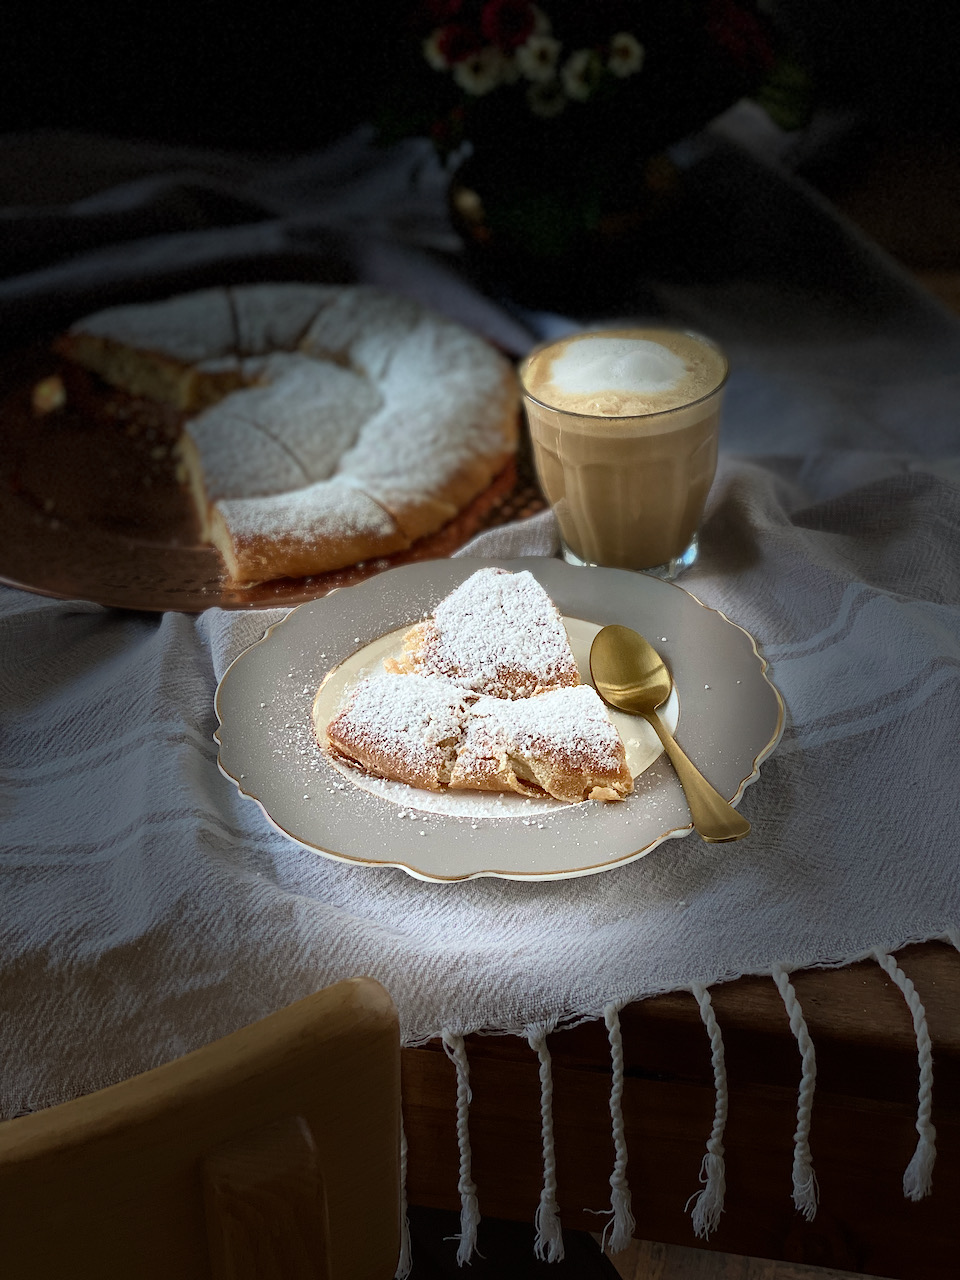
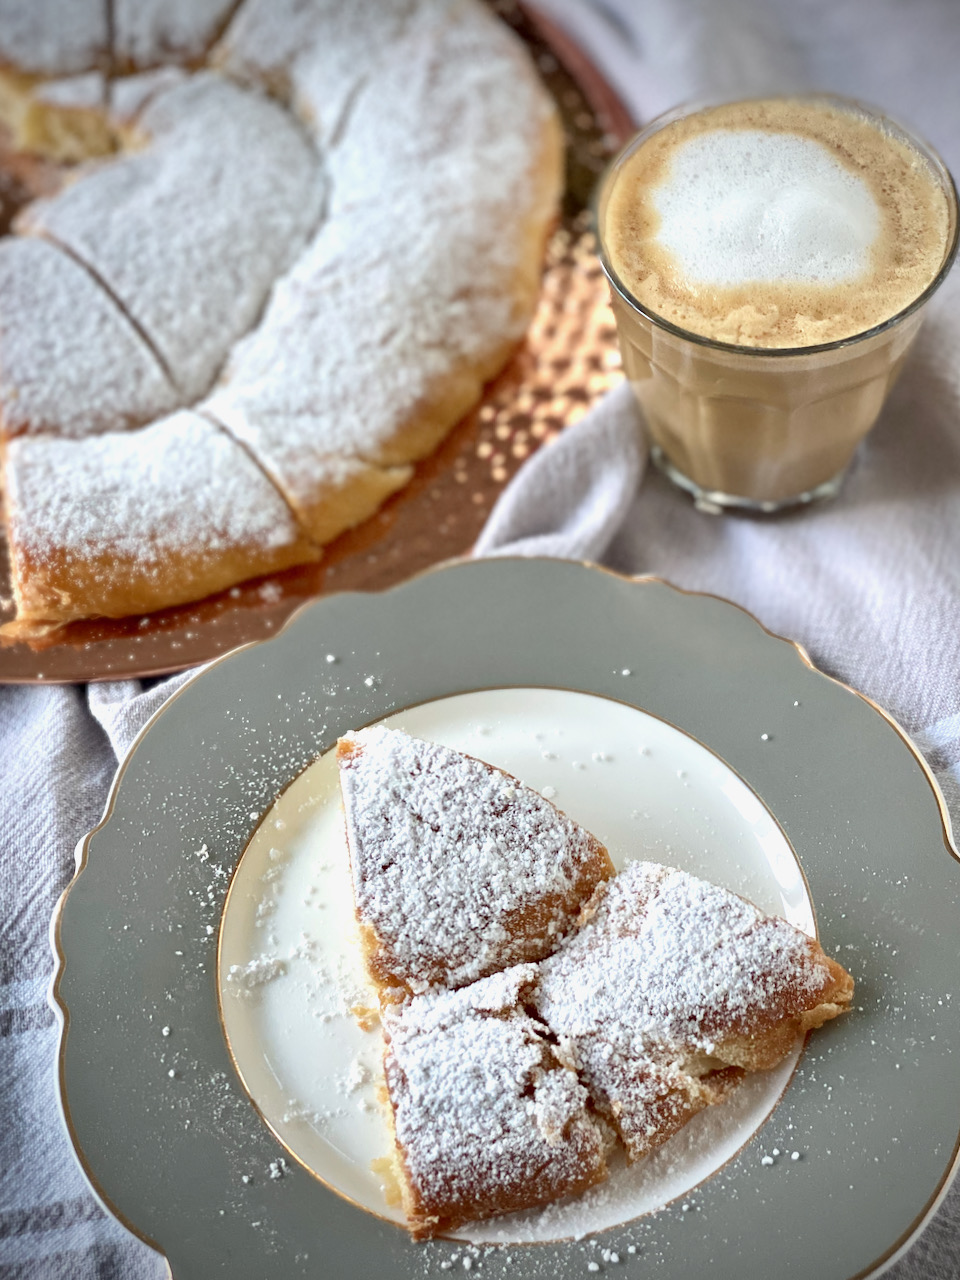
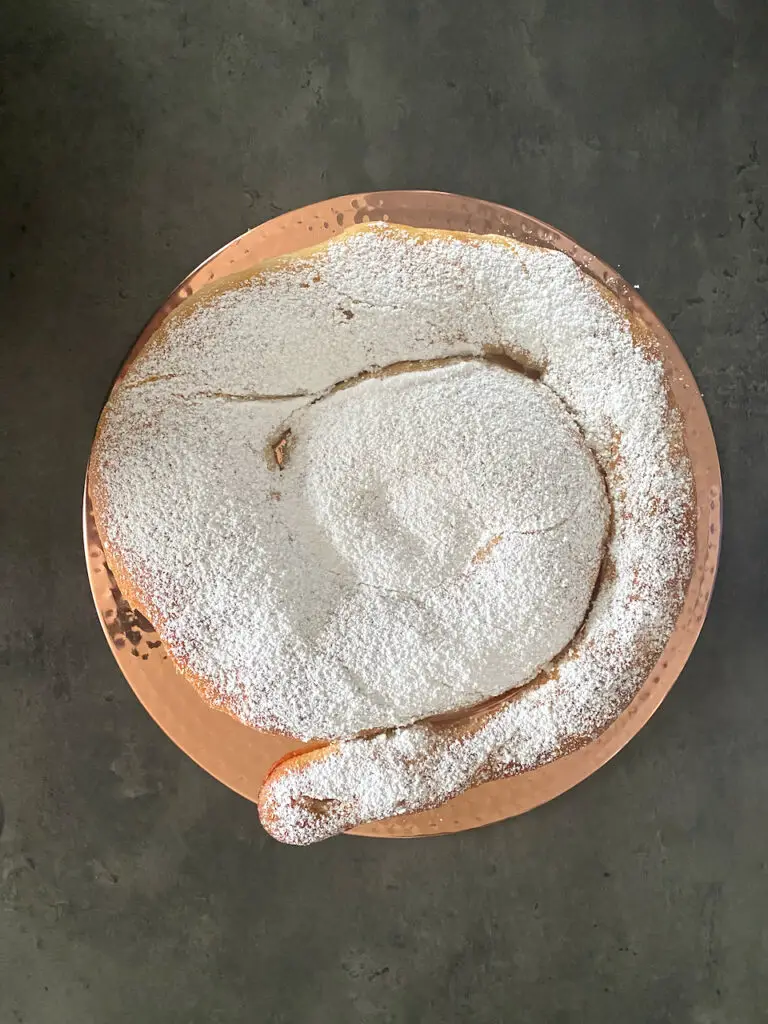
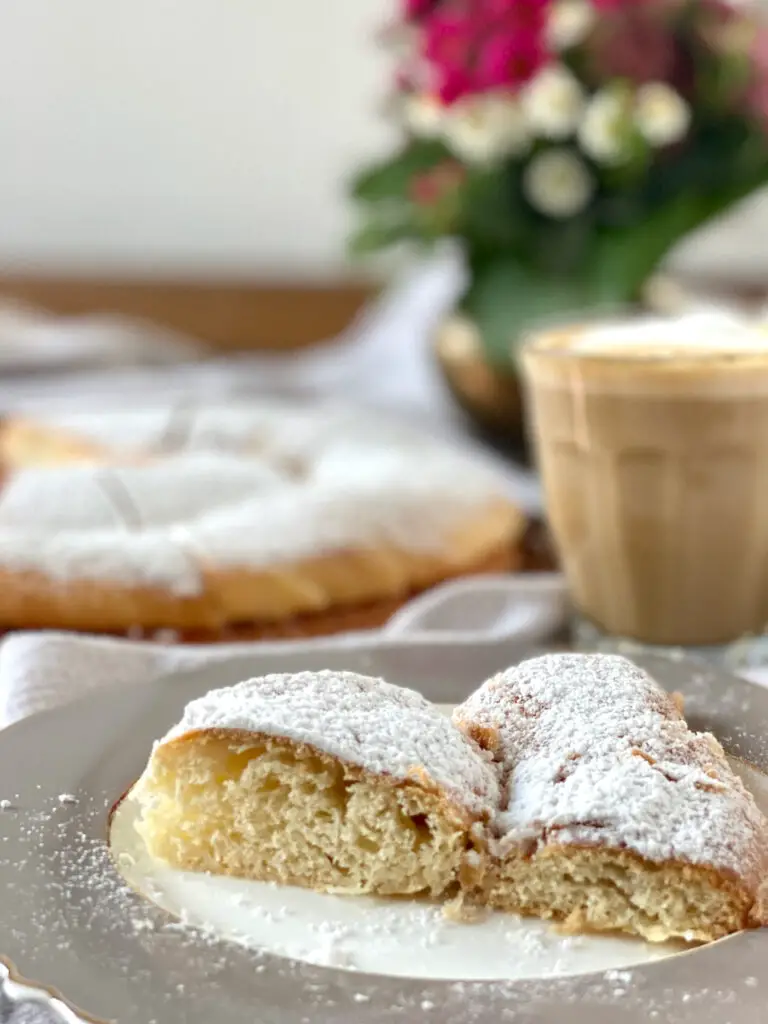
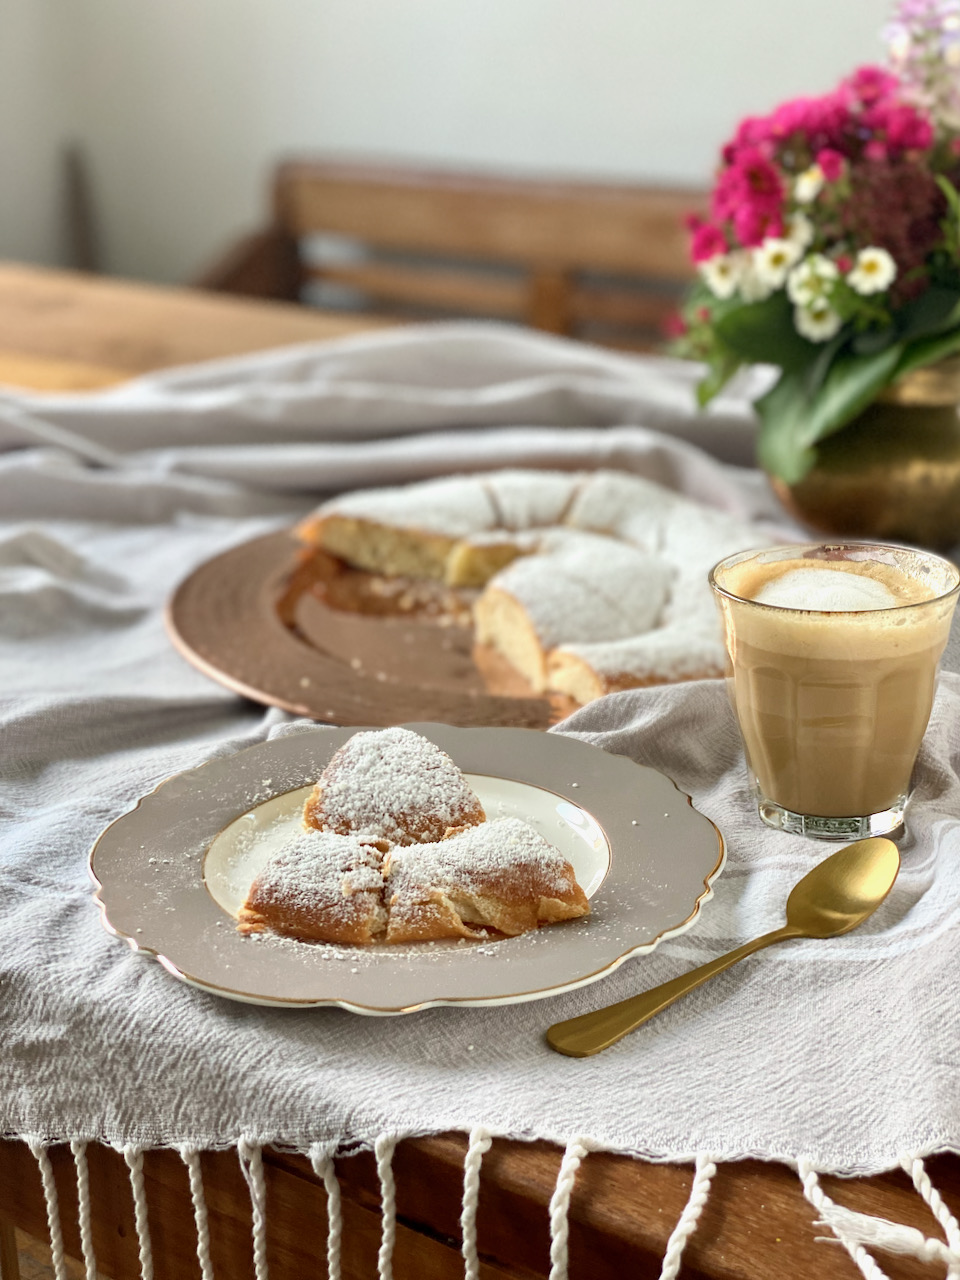
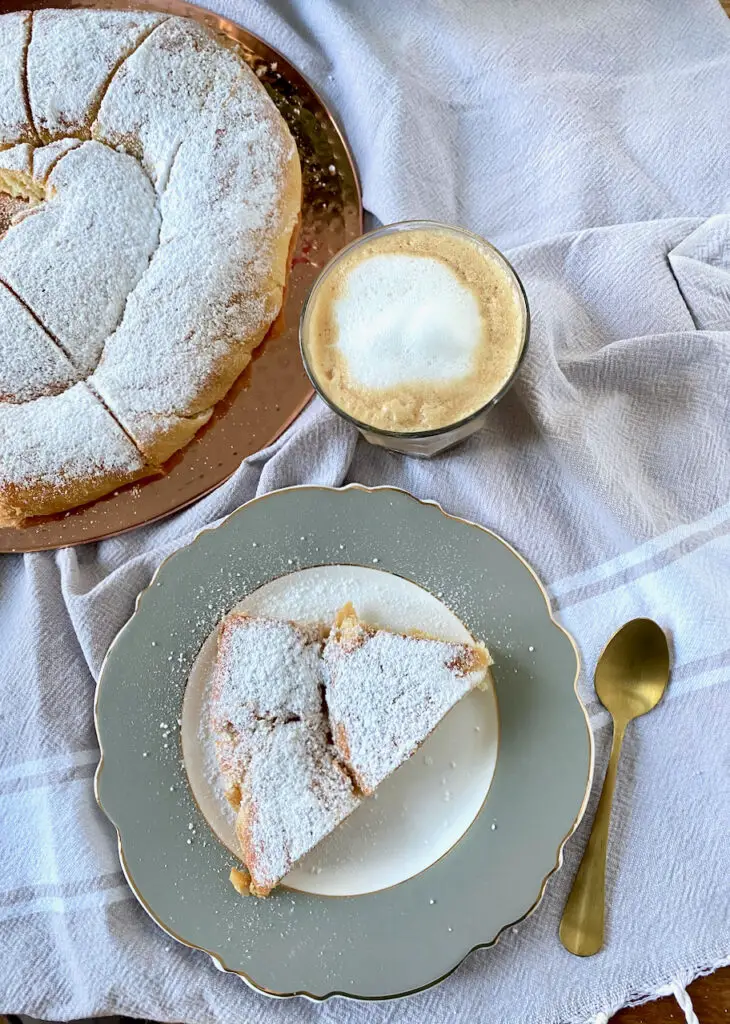
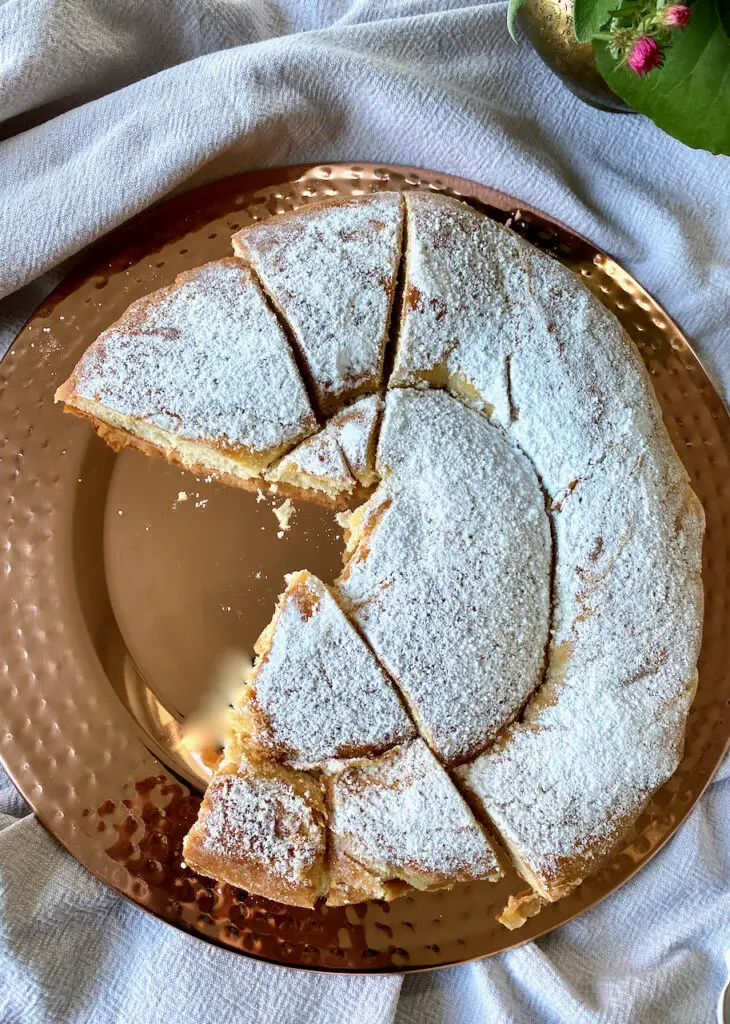
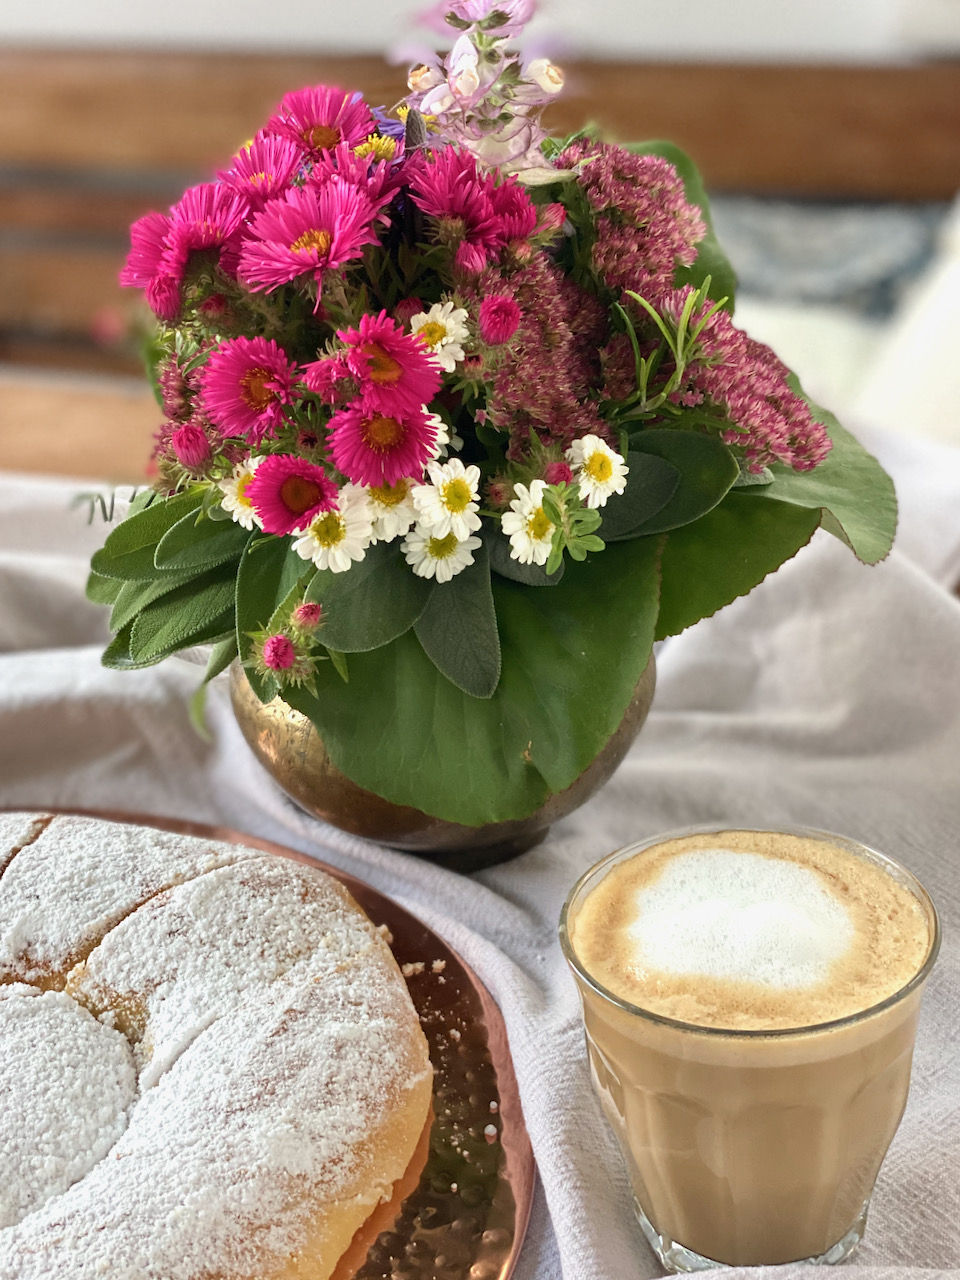
An Ensaimada is a traditional, spiral-shaped sweet yeast bread from the Balearic Islands. The perfect pastry boasts a beautifully crisp outer crust, an incredibly flaky, laminated interior, and a generous dusting of powdered sugar.
THE SECRET INGREDIENT : THE ORIGIN OF “ENSAIMADA”
The unforgettable, melt-in-your-mouth texture comes down to one core ingredient. The name Ensaimada literally translates from Mallorcan to English as “the en-larded one.”
In the local Mallorcan language, saïm means pork lard. Without it, the pastry loses its authentic texture and cultural heritage.
SEO Baker’s Tip: Pure pork lard contains more heart-healthy unsaturated fatty acids (including Omega-3s) than coconut oil or commercial butter. For the best flavor profile, always buy organic, high-quality pork lard. However, if you need a vegetarian alternative, you can substitute it with high-quality unsalted butter.

WHY YOU’LL LOVE THIS TRADITIONAL MALLORCAN RECIPE
- Instant Vacation Vibes: One bite transports you to a cozy café in a cobblestone alley in Palma.
- Pantry-Friendly Ingredients: You only need basic baking staples to recreate this bakery classic.
- The Ultimate Brunch Centerpiece: It pairs exquisitely with your morning coffee or a rich hot chocolate.
THE LOCAL WAY TO EAT ENSAIMADAS FOR BREAKFAST
A MALLORCAN MORNING RITUAL
For my family, one sacred ritual officially kicks off every trip to Spain: a traditional Mallorcan breakfast.
We always wander down a cobblestone alley to find a hidden, local bakery. Through the window, fluffy, cloud-like pastries heavily dusted with sugar practically wink at us. My youngest child and my husband always start their day with a palm-sized Ensaimada de Mallorca llisa—the classic, unfilled version of this sweet spiral. Watching them take a huge bite and smile back at me with goofy “powdered-sugar beards” is pure vacation magic.
THE SECRET ETIQUETTE – DON’T BITE DIRECTLY INTO IT!
To avoid awkward stares from the locals, follow this golden rule: never bite directly into a whole Ensaimada in public.
To eat an Ensaimada like a true Mallorcan, follow these steps:
- Gently tear off a small section with your fingers.
- Elegantly dip the piece into your hot beverage.
- Enjoy the melt-in-your-mouth texture.
- The Kids’ Choice: Children love dipping their pastry into a cup of thick, Spanish-style hot chocolate (xocolata).
- The Savory Twist: If you prefer savory breakfasts, order a rustic Pa amb Oli (Mallorcan tomato toast) paired with a piping-hot Cortado, then steal a tiny sweet corner of an Ensaimada for dessert.
MASTERING THE DOUGH – FLOUR CHOICE AND THE 24-HOUR RISE
To get the signature elasticity required to stretch the dough paper-thin, you must use the right flour and give the yeast plenty of time to work.
The Flour Blueprint
- In the US: Use a high-quality Bread Flour.
- In the UK: Look for Strong White Bread Flour.
- In Germany: Select Type 550 flour.
- Why? High-protein flour develops a strong gluten network, allowing you to roll the dough exceptionally thin without tearing it.
THE 12 TO 24-HOUR FERMENTATION RULE
Good things take time, and this Spanish pastry requires patience. Before baking, the dough undergoes a slow fermentation process lasting anywhere from 12 to 24 hours. This overnight proofing stage creates the signature airy, delicate pockets inside the pastry.
HOW TO SHAPE AN AUTHENTIC ENSAIMADA
When shaping your dough roll, you must respect the historical customs of the Balearic bakers:
- The Clockwise Rule: Always coil the dough roll in a clockwise direction.
- Count the Spirals: A proper Ensaimada requires at least two full concentric loops.
- The Texture Contrast: The baking process creates a light, dry top layer balanced by a rich, slightly oily base.
- Keep napkins nearby—finger-licking is part of the experience!
FROM SUNRISE TO SUNSET – SIZES AND TRADITIONS
Interestingly, the size of the pastry changes throughout the day! Morning Ensaimadas are usually small, palm-sized treats weighing around 60 grams (2 oz)—perfect for a quick breakfast on the go with a cortado or Café con Leche-
But as the day goes on, they grow. By afternoon or for special celebrations, you can find giant versions weighing up to 3 kg (over 6 lbs)!
Depending on the season, locals pair it with different drinks:
- In Winter: Plunged into a mug of thick, rich hot chocolate.
- In Summer: Enjoyed alongside a refreshing scoop of ice cream.
THE BEST ENSAIMADA FILLINGS: SWEET, SAVORY, AND SEASONAL
When it comes to Ensaimadas on the island, you have two main choices: filled or unfilled. While the plain Llisa remains a timeless classic, Mallorcan bakeries showcase their creativity through an array of incredible fillings.
CLASSICS
- Llisa – The unfilled classic. Llisa means “smooth” or “plain”.
- Cabell d’Àngel (Angel’s Hair) – The most famous, traditional filling is Cabell d’Àngel. This unique Spanish jam utilizes the strands of the Siam pumpkin, which bakers crystallize with sugar. When you cut open an Ensaimada de Cabell d’Àngel, you can actually see the golden, translucent, thread-like pumpkin fibers inside the sweet pastry layers.
- Sobrassada (The Sweet & Savory Pastry) – For a true culinary adventure, try the savory-sweet variation filled with Sobrassada—Mallorca’s iconic, spreadable cured paprika pork sausage. Bakers top this savory-filled pastry with a heavy coating of sweet powdered sugar, creating a spectacular flavor contrast.
- Today, modern Mallorcan bakers let their imaginations run wild, filling these spirals with everything from pistachio cream to salted caramel. The possibilities are truly endless!
- Carnival Specials and Festive Treats – During the February Carnival season, look out for these rare specialties:
- Ensaimada de Tallades: A festive pastry topped with slices of Sobrassada sausage and sweet candied pumpkin.
- Apricot Ensaimadas: A summer-inspired version topped with juicy, tart halves of local fresh apricots.
- Dessert Variations: Modern bakeries serve decadent versions oozing with rich vanilla custard (crema) or velvety chocolate (xocolata).
CRAVING MORE MEDITERRANEAN RECIPES?
If you want to expand your Spanish baking repertoire, check out my step-by-step recipe for Flaó de Ibiza—a spectacular, traditional Balearic cheesecake infused with fresh mint and anise that brings the taste of the Mediterranean straight to your home!
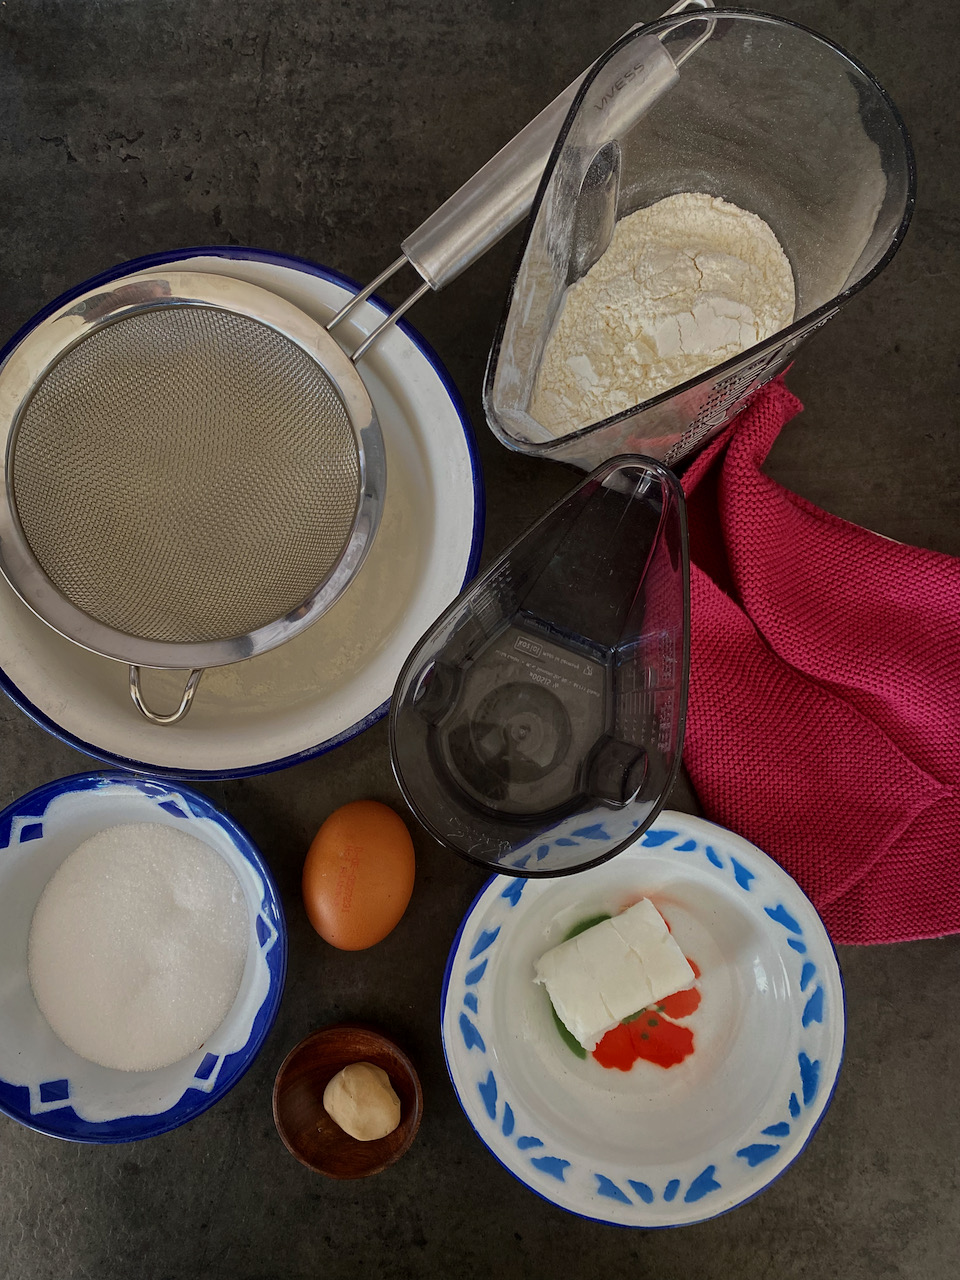
INGREDIENTS AUTHENTIC MALLORCAN ENSAIMADA
INGREDIENTS FOR THE SWEET YEAST DOUGH
250g Bread Flour (Strong White Bread Flour in the UK or German Type 550)
80g Water (Lukewarm)
1 Medium Egg (Room temperature)
80g Granulated Sugar (White caster sugar)
25g Pork Lard (Softened at room temperature)
8g Fresh Yeast (Or 2.5g / 1 tsp of Active Dry Yeast)
INGREDIENTS FOR THE LAMINATION & FINISHING
150g Pork Lard (Softened to a spreadable, butter-like consistency)
Canola Oil (to grease your hands and work surface)
Powdered Sugar
STEP-BY-STEP INSTRUCTIONS ENSAIMADA DE MALLORCA
Mastering this traditional Mallorcan pastry requires a unique technical process called interval kneading, followed by a patient overnight slow rise. Follow these steps precisely to guarantee those airy, flaky, melt-in-your-mouth layers.
PHASE 1: KNEAD THE PERFECT YEAST DOUGH
Mix the Base Ingredients: 5 mins.
Add all the dough ingredients except the yeast into the bowl of a stand mixer fitted with a dough hook. Mix until combined. The dough will feel sticky at first, don’t panic! Let it rest right in the bowl for 5 minutes.
The Interval Kneading Method: approx. 40 mins.
To build ultimate elasticity without overheating the dough, use the interval method: Knead for 1 minute, then let it rest for 10 minutes. Repeat this exact cycle 3 to 4 times.
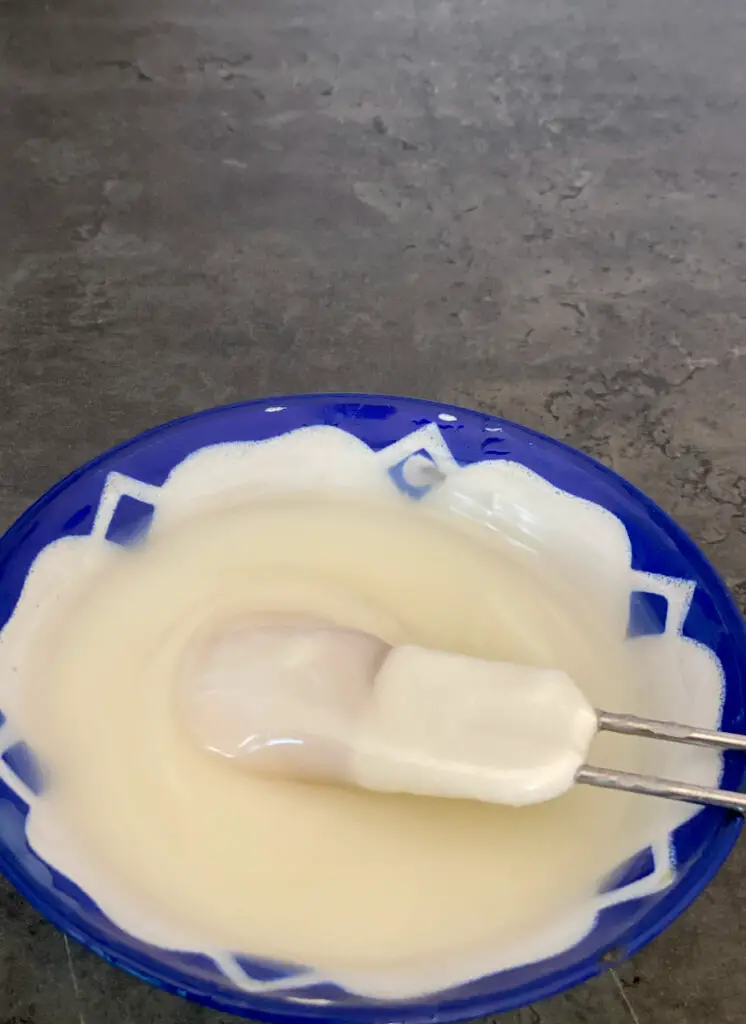
Perform the Windowpane Test:2 mins.
After your final rest interval, check the gluten development. Gently stretch a piece of dough between your fingers. If it stretches into a smooth, translucent membrane without tearing, your dough is ready.
Incorporate the Yeast: 32 mins.
Crumble the fresh yeast directly into the dough during the final kneading round. Knead one last time until fully incorporated, then let the dough rest undisturbed for 30 minutes.
PHASE 2: STRETCHING, LAMINATING AND COILING
This is where the magic happens! To achieve the ultimate flaky texture, you must stretch the dough until it resembles translucent paper.
Prep Your Workspace: 5 mins.
Lightly grease a large workspace (ideally around 140 x 100 cm / 55 x 40 inches) and your rolling pin with neutral vegetable oil. This prevents this delicate dough from sticking.
Roll into a Rectangle: 10 mins.
Roll the dough out into a long rectangle measuring roughly 100 x 30 cm (40 x 12 inches). Use a pastry brush to spread the 150g of softened, creamy pork lard evenly over the entire surface.
Stretch to Translucency: 15 mins.
Gently pull and stretch the dough out from the edges until it becomes paper-thin and see-through, just like an Austrian strudel dough. Keep your hands well-oiled to assist the stretching. If the dough resists or shrinks back, let it rest for a minute before continuing.
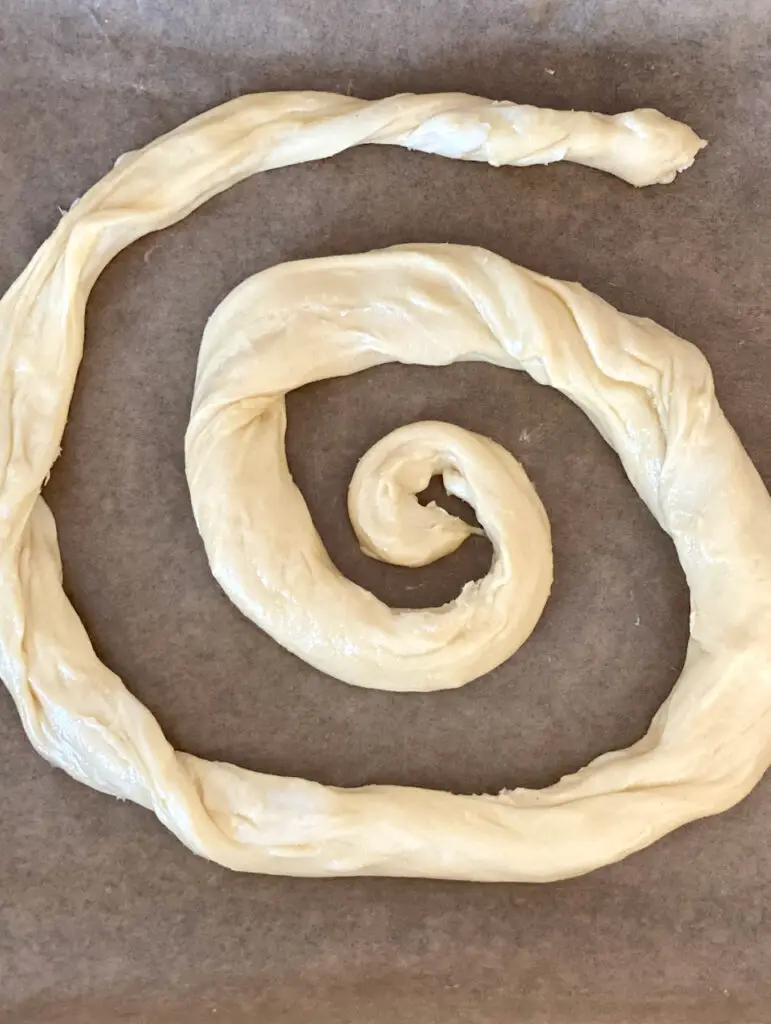
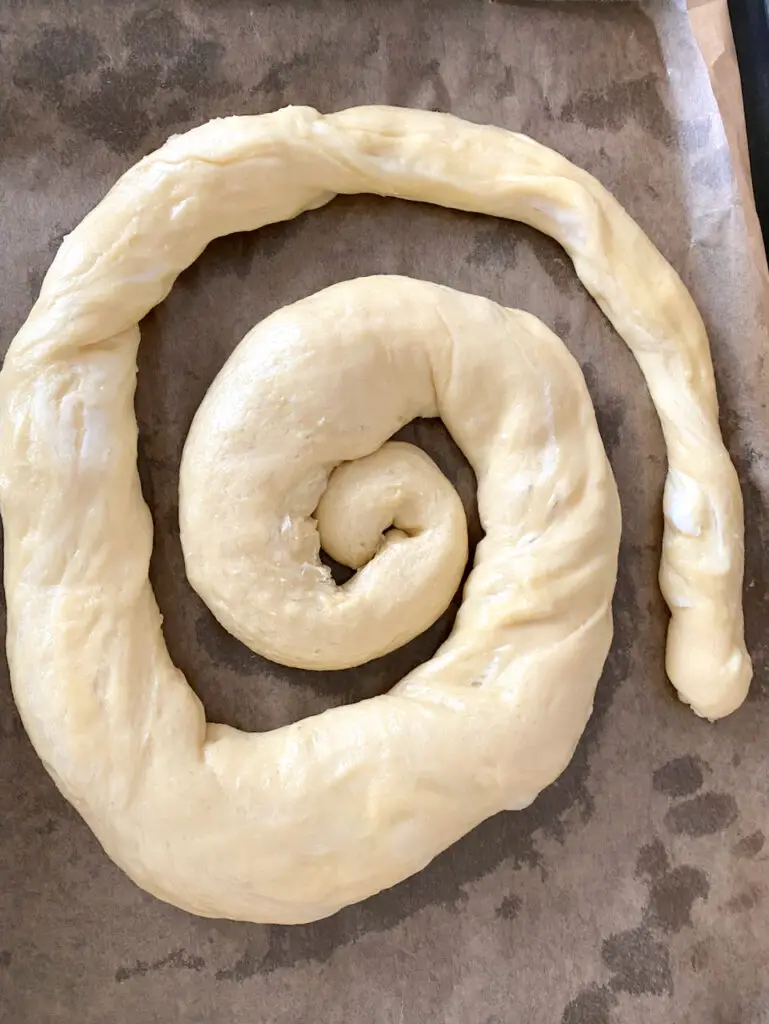
Roll the Cylinder: 5 mins.
Starting from the long side, carefully roll the paper-thin dough upward into a long rope. Roll it back and forth gently on your counter until the cylinder stretches to over 1 meter (3.3 feet) long. Let the long rope rest for 25 minutes.
Shape the Clockwise Spiral: 5 mins.
Line a baking sheet with parchment paper. Take your dough rope and gently coil it into a loose spiral in a clockwise direction. Leave plenty of gaps between the coils, the dough needs room to expand exponentially as it proofs!
PHASE 3: THE LONG SIDE AND FINAL BAKE
The Overnight Proof (12 to 24 Hours)
Place the shaped pastry into a cold, turned-off oven to rise. This traditional proofing stage typically takes 12 to 14 hours.
Baker’s Note on Patience: Depending on your room temperature and yeast activity, it might take much longer to puff up. If your kitchen is cool, don’t rush it, give the dough up to 20 or 24 hours to complete its slow rise. Trust the process!
The Bake
Preheat your oven to 180°C (350°F).
Place a small metal heatproof bowl filled with water on the bottom rack of the oven. This creates steam, ensuring a spectacularly crispy outer crust.
Bake the Ensaimada for 18 to 20 minutes until beautifully golden brown.
The Finishing Touch
Let the pastry cool completely on a wire rack. Once fully cooled, dust it heavily with a thick, snowy layer of powdered sugar.
SERVING AND STORAGE TIPS
- Enjoy it Fresh: For the ultimate taste experience, enjoy your Ensaimada on the same day you bake it.
- Freezing Instructions: If you have leftovers, wrap them tightly and store them in the freezer. When a craving strikes, simply reheat the frozen slices in a hot oven for a few minutes to restore that magical, bakery-fresh crispness!
Befarmayid
Susan
The items marked with * are affiliate links, referral links. If you buy through this link, I get a small commission. The price stays the same for you and you can easily support my efforts. A big thank you ♥

Authentic Ensaimada de Mallorca Recipe
Ingredients
INGREDIENTS AUTHENTIC MALLORCAN ENSAIMADA
INGREDIENTS FOR THE SWEET YEAST DOUGH
- 250 g Bread Flour Strong White Bread Flour in the UK or German Type 550
- 80 g Water Lukewarm
- 1 Medium Egg Room temperature
- 80 g Granulated Sugar White caster sugar
- 25 g Pork Lard Softened at room temperature
- 8 g Fresh Yeast Or 2.5g / 1 tsp of Active Dry Yeast
INGREDIENTS FOR THE LAMINATION & FINISHING
- 150 g Pork Lard Softened to a spreadable, butter-like consistency
- Canola Oil to grease your hands and work surface
- Powdered Sugar
Instructions
STEP-BY-STEP INSTRUCTIONS ENSAIMADA DE MALLORCA
PHASE 1: KNEAD THE PERFECT YEAST DOUGH
-
Mix the Base Ingredients: 5 mins.
-
Add all the dough ingredients except the yeast into the bowl of a stand mixer fitted with a dough hook. Mix until combined. The dough will feel sticky at first, don’t panic!
-
Let it rest right in the bowl for 5 minutes.
-
The Interval Kneading Method: approx. 40 mins.
-
Knead for 1 minute, then let it rest for 10 minutes.
-
Repeat this exact cycle 3 to 4 times.
-
Perform the Windowpane Test:2 mins.
-
After your final rest interval, check the gluten development. Gently stretch a piece of dough between your fingers. If it stretches into a smooth, translucent membrane without tearing, your dough is ready.
-
Incorporate the Yeast: 32 mins.
-
Crumble the fresh yeast directly into the dough during the final kneading round.
-
Knead one last time until fully incorporated, then let the dough rest undisturbed for 30 minutes.
PHASE 2: STRETCHING, LAMINATING AND COILING
-
To achieve the ultimate flaky texture, you must stretch the dough until it resembles translucent paper.
-
Prep Your Workspace: 5 mins.
-
Lightly grease a large workspace (ideally around 140 x 100 cm / 55 x 40 inches) and your rolling pin with neutral vegetable oil. This prevents this delicate dough from sticking.
-
Roll into a Rectangle: 10 mins.
-
Roll the dough out into a long rectangle measuring roughly 100 x 30 cm (40 x 12 inches).
-
Use a pastry brush to spread the 150g of softened, creamy pork lard evenly over the entire surface.
-
Stretch to Translucency: 15 mins.
-
Gently pull and stretch the dough out from the edges until it becomes paper-thin and see-through, just like an Austrian strudel dough. Keep your hands well-oiled to assist the stretching.
-
If the dough resists or shrinks back, let it rest for a minute before continuing.
-
Roll the Cylinder: 5 mins.
-
Starting from the long side, carefully roll the paper-thin dough upward into a long rope.
-
Roll it back and forth gently on your counter until the cylinder stretches to over 1 meter (3.3 feet) long.
-
Let the long rope rest for 25 minutes.
-
Shape the Clockwise Spiral: 5 mins.
-
Line a baking sheet with parchment paper.
-
Take your dough rope and gently coil it into a loose spiral in a clockwise direction.
-
Leave plenty of gaps between the coils, the dough needs room to expand exponentially as it proofs!
PHASE 3: THE LONG SIDE AND FINAL BAKE
-
The Overnight Proof (12 to 24 Hours)
-
Place the shaped pastry into a cold, turned-off oven to rise. This traditional proofing stage typically takes 12 to 14 hours.
-
Baker’s Note on Patience: Depending on your room temperature and yeast activity, it might take much longer to puff up.
-
If your kitchen is cool, don’t rush it, give the dough up to 20 or 24 hours to complete its slow rise. Trust the process!
-
The Bake
-
Preheat your oven to 180°C (350°F).
-
Place a small metal heatproof bowl filled with water on the bottom rack of the oven. This creates steam, ensuring a spectacularly crispy outer crust.
-
Bake the Ensaimada for 18 to 20 minutes until beautifully golden brown.
-
The Finishing Touch
-
Let the pastry cool completely on a wire rack.
-
Once fully cooled, dust it heavily with a thick, snowy layer of powdered sugar.
-
Enjoy it Fresh: For the ultimate taste experience, enjoy your Ensaimada on the same day you bake it.
Recipe Notes
SERVING AND STORAGE TIPS
Freezing Instructions: If you have leftovers, wrap them tightly and store them in the freezer. When a craving strikes, simply reheat the frozen slices in a hot oven for a few minutes to restore that magical, bakery-fresh crispness!
Have you cooked this or maybe another delicious recipe of mine? Feel free to leave me a comment below. If you tag your picture on Instagram with @labsalliebe and use the hashtag #labsalliebe, I won’t miss a post and will be happy to leave you a comment as well. Can’t wait to see your creations.
♥♥♥♥♥♥♥♥♥♥♥♥♥♥♥♥♥♥♥♥♥♥♥♥♥♥♥♥♥♥♥♥